
I still remember the first time I tried wearing a saree by myself. It looked easy when my mom did it. Two minutes, a few neat pleats, one final pin. Done.
Me? I don’t know how to Wear a Saree and somehow managed to get twisted pleats, the pallu falling off every time I moved, and that weird lumpy belt situation around the waist that made no sense. So yeah. If you have ever felt like sarees are beautiful but slightly intimidating, you are not alone.
The good news is, it is not complicated once you do it in the right order. This is the exact guide I wish someone had handed me earlier.
How to wear a saree in 7 steps (the quick checklist before you start)
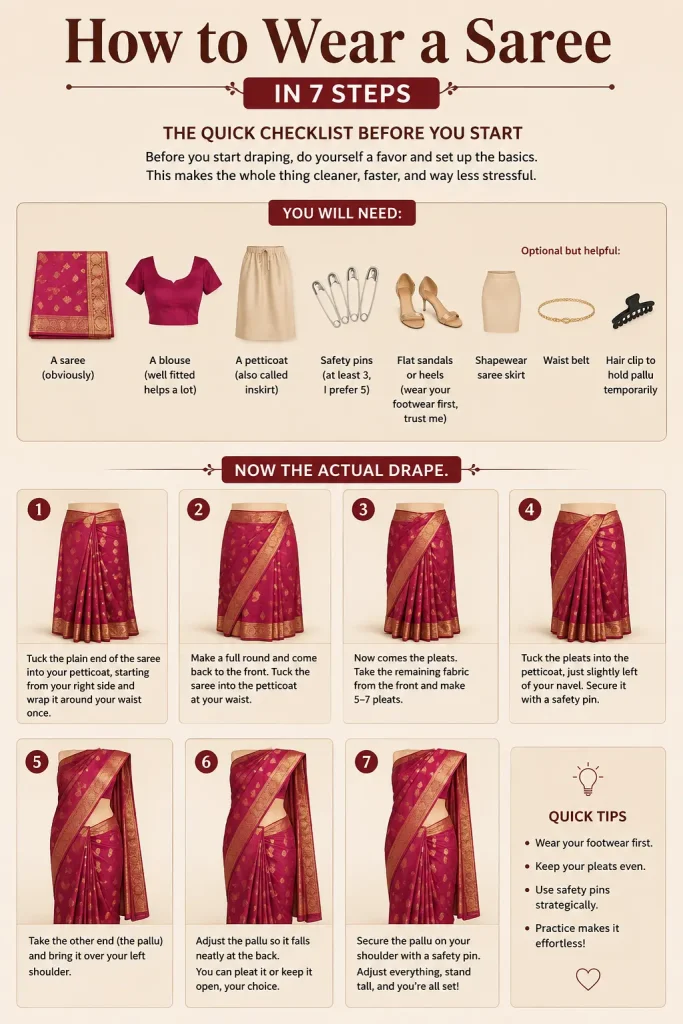
Before you start draping, do yourself a favor and set up the basics. This makes the whole thing cleaner, faster, and way less stressful.
You will need:
- A saree (obviously)
- A blouse (well fitted helps a lot)
- A petticoat (also called inskirt)
- Safety pins (at least 3, I prefer 5)
- Flat sandals or heels (wear your footwear first, trust me)
- Optional but helpful: shapewear saree skirt, waist belt, hair clip to hold pallu temporarily
Now the actual drape.
How to wear a saree step 1: Pick the right saree and prep it (do not skip this)
Not all sarees behave the same. If this is your first or second time, go for something that stays put.
Best beginner friendly fabrics:
- Cotton (stiff, holds pleats well, but can feel bulky)
- Georgette or chiffon (looks flowy, but needs more pins)
- Crepe (good middle ground)
- Soft silk blends (easy to manage if not too heavy)
Quick prep that helps in how to wear a saree:
- Iron the saree. Especially the pleat area. Wrinkles make everything look messy.
- Find the “fall” and “pallu” ends. Usually the pallu has heavier design.
- Decide how you want the pallu. Over the left shoulder is the classic style.
Also. Wear your blouse and petticoat first, properly. Tie the petticoat tight enough so it does not slip, but not so tight that you cannot breathe after dinner.
How to wear a saree step 2: Start tucking the saree into the petticoat (set your base)
Stand straight, face a mirror if you can. Hold the plain end of the saree (the end opposite the pallu) and start tucking it into the petticoat at your right waist.
Now wrap it around your body once, clockwise, and keep tucking as you go.
A few small things that matter here:
- Keep the bottom edge of the saree at a consistent height from the floor.
- If you are wearing heels, wear them now and set the saree length accordingly.
- The tuck should be smooth, not bunched. If it bunches, pull it out and redo that section. Annoying, yes. Worth it, also yes.
When you complete one full wrap, you should be back to the front, with enough fabric left to start making pleats.
How to wear a saree step 3: Make the front pleats neatly (this is the main moment)
Take the fabric in front of you and start making pleats about 4 to 6 inches wide. Most people do 5 to 8 pleats depending on saree thickness and their waist.
How to keep it neat:
- Use your fingers like a comb, fold one pleat at a time.
- Keep the pleats aligned at the top edge.
- Shake the pleats slightly so they fall straight.
Once the pleats are made, hold them together firmly and check the length again. The pleats should end around the center of your feet, not dragging too much, not floating above your ankles.
This is the part everyone worries about when thinking how to wear a saree. But once you get it, it is almost automatic.
Now tuck the pleats into the petticoat slightly left of your navel (or right at the center, depending on preference). Make sure the pleats face left. That is the traditional direction for the basic Nivi drape.
Pin it. Please pin it.
One safety pin through the pleats into the petticoat will save you from a whole day of adjusting.
How to wear a saree step 4: Secure the pleats at the waist so they do not spread out
This step is optional, but honestly it makes a huge difference, especially if you will be moving around, dancing, walking a lot, or just existing in a saree for more than 30 minutes.
After tucking the pleats, take one more safety pin and pin the pleats together at mid thigh level (not too tight, just enough to keep them aligned). Some people pin at the waist too, but waist pinning can show. Mid thigh pinning stays hidden and keeps pleats crisp.
If you want an even cleaner look, you can also use a slim waist belt on top of the saree at the waist. Not mandatory. But very useful if your petticoat tends to loosen.
How to wear a saree step 5: Drape the pallu and decide the length (short, medium, or long)
Now take the remaining fabric (the part that includes the pallu) and bring it around your back to the front and then over your left shoulder.
This is where style comes in how to wear a saree . There are three common pallu lengths :
- Short pallu (ends around waist or hip). Easier to manage, modern look.
- Medium pallu (ends around knees). Most common, balanced.
- Long pallu (near calves). Dramatic, traditional, but can get in the way.
Once you choose your length, let the pallu fall over your left arm and check how it looks in the mirror.
If the pallu keeps slipping, pin it to your blouse at the shoulder. Just a small pin. Hidden in the blouse seam if possible.
And if you want the pallu pleated (more formal look), you can make 5 to 7 thin pleats in the pallu before placing it on the shoulder, then pin it. This is the most important part in how to wear a saree .
How to wear a saree step 6: Adjust the front and side drape so it looks smooth (this is the “polish”)
At this point, the saree is technically done. But the difference between “I wrapped a saree” and “I look put together in a saree” is this step. Two minutes of adjusting.
Check these areas:
- The waistline. Any bulky tucks? Smooth them out.
- The hip area. If fabric is too tight, loosen slightly. If it is sagging, retuck.
- The pleats. Are they falling straight? If not, pull them gently down and align.
- The pallu. Does it look balanced from front and back?
Also check the blouse coverage at the back. Sometimes the saree slips low and exposes the back tie area more than you want. If so, retuck at the waist and pin the pallu again.
This is also where you can add accessories like a waist belt, brooch on pallu, or statement earrings. Not required in how to wear a saree, but it elevates the look fast.
How to wear a saree step 7: Final pin check and walking test (yes, do a walking test)
This sounds silly until you do it once and realize why it matters.
Do this:
- Walk around the room.
- Sit down.
- Stand up.
- Lift your feet like you are stepping into a car.
- Raise your arms, see if pallu shifts.
If something feels loose, pin it now while learning how to wear a saree. Not later when you are outside and trying to fix your saree in a bathroom mirror while holding your phone and a clutch.
My usual pin placements:
- One pin at front pleats into petticoat
- One pin holding pallu to blouse at shoulder
- One hidden pin mid thigh to keep pleats together
- Optional: one pin at right waist tuck if fabric is slippery
That is it. You are done. N o more need to search how to wear a saree
Common mistakes when wearing a saree (and how to avoid them)
These are the common mistakes ignored while answering how to wear a saree,
- Petticoat tied too loose: the saree will slowly slide down. Tie it firm.
- Uneven saree length: set it while wearing your footwear.
- No pins on slippery fabric: chiffon and georgette need pins. It is not optional.
- Pleats too wide: they look bulky. Keep them medium width for a cleaner fall.
- Pallu too heavy without support: pin it. Or pleat it. Or use a brooch.
Also, do not panic if the first attempt is not perfect. Saree draping is weirdly like eyeliner. Your hands learn over time to how to wear a saree .
Shop your look here.